DEMO 1. SHIFTING BETWEEN NEGATIVE AND POSITIVE PAINTING
Painting in the Negative (defining a shape by painting its background darker) is an essential skill in watercolours. If one paints only in the positive (painting the actual shape darker than its background) their work can appear
unnaturally flat. In the real world we are able to define what we see because some objects are darker than their background and others lighter and the transition from one to the other exists everywhere. When painting we must remember that we always have the option of painting in the Negative or Positive and moving from one to the other.
For Example:

When ever you are painting positive shapes you always have the option of defining negative shapes as you go.
In this sample the dark positive shapes define the leaves, fence and ferns in the negative.
Of course this painting could have started on a dry loose multi-coloured wash or passage for more dramatic effect. The following sample was started on just such a background.

This time I started with the negative shapes that define the space between the trees but the marks that define the outer edges of the trunks are carried outward to define new positive shapes. As in the first example some of these positive shapes are used to define more negative shapes, as in the case of the foreground tree on the left, the leaves and undergrowth.

Next, to enhance depth, I defined new trees further back in the painting by using darker colour in the negatively painted areas and paler colours in the positive areas.

Finally, with the addition of loose, pale blue cast shadows on the foreground trees this simple composition takes on fullness.
With practice you will soon find yourself automatically shifting back and forth between negative and positive painting and adding a new dimension of realism to your work.
DEMO 2: SO, JUST WHERE DO I PUT THE BRANCHES?
This little demo illustrates the importance of branch and trunk placement in a forest scene.
As you will see their placement affects light direction and the illusion of depth in the trees.

I first painted a loose passage of
mid-value Greens and let it dry
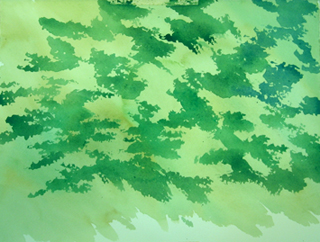
I then painted in random darker green patches. In this case I used a sponge because it produced more irregular shapes. I tried to cover
about 50% of the lighter green background.
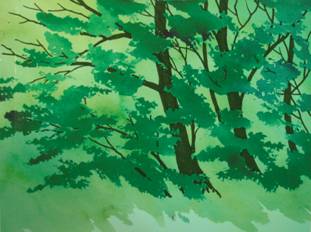
Option 1. If the trunks and branches are
painted into the light green areas the illusion is back-lit trees

Option 2. If the trunks and branches are painted into the dark green areas the illusion is front-lit
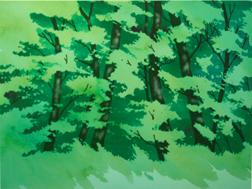
Scrub back light areas on the dark trunks to enhances the front-lit affect.
The next two pictures illustrate optional transitions across the picture between back lighting and front
lighting. (branches in the light areas to branches in the dark areas). By combining the two you can create
more variety and depth in your forest.


Please note: This process of painting branches and trunks does not involve Negative painting although when the trunks are places in the dark areas it does make the light leaves appear as if they were painted that way.
So go ahead. Get lost in the forest.
DEMO 3: PERSPECTIVE